
Lifestyle
How to Evaluate an Assisted Living Community Before Making a Move


When selecting an assisted living community, families should look for more than just a polished tour or favorable online rating. They need clear information about personal care, staffing, safety, nutrition, activities, fees, and medical support.
Older adults deserve a setting that respects their routine, privacy, mobility, and social preferences. Careful preparation gives relatives a practical basis for comparison. Notes from each visit, direct questions for administrators, and candid conversations with residents can help highlight differences that promotional materials may not cover.
Define Current Care Needs
Before visiting communities, families should record tasks that require assistance, including bathing, dressing, toileting, medication reminders, walking, meals, and transportation. Each activity should have a column that describes its usual frequency and level of help.
Families researching assisted living in Spokane, WA, and nearby areas should compare these requirements with services available at each residence. This written profile helps staff accurately estimate care needs and identifies gaps before a contract is signed. A physician can also clarify whether the setting matches current health conditions.
Review Service Levels
Care packages differ considerably between residences. Administrators should provide a written list covering personal hygiene, medication administration, nursing availability, therapy coordination, emergency response, and appointment transportation.
Families need to ask which services require them to pay separate fees. The agreement should explain how staff members reassess assistance after a fall, a hospital stay, or a decline in strength. Clear answers help relatives distinguish a suitable setting from one that offers fewer services than expected.
Examine Staffing Patterns
Staff availability affects response time, medication safety, and continuity of care. During a visit, families should ask how many employees work on each shift, including overnight hours. Questions about turnover, clinical training, background screening, and temporary workers can reveal operational strain. A reliable residence should explain two important things:
- Who answers emergency calls?
- Who contacts medical professionals?
Observing staff interactions can be equally revealing. Respectful greetings, patient explanations, and unhurried movement suggest attentive daily care.
Inspect Safety Features
Safety checks should cover entrances, exits, corridors, bathrooms, elevators, kitchens, and outdoor walkways. Families should look for adequate lighting, stable handrails, unobstructed floors, reachable call buttons, and bathroom grab bars.
It is crucial to ask detailed questions about emergency procedures, including fire evacuation, severe weather, missing residents, and hospital transfers. Rooms should accommodate walkers or wheelchairs without cramped pathways. Administrators should also explain how staff assess fall risk and document preventive measures.
Compare Costs Carefully
A monthly rate rarely represents the full financial obligation. Families should request itemized charges for rent, meals, utilities, housekeeping, transportation, medication assistance, supplies, and increased care. The contract should state deposit terms, billing dates, refund rules, notice periods, and expected annual adjustments.
A comparison worksheet can separate included services from optional costs and possible future expenses. An elder-law attorney or financial counselor may help relatives review unfamiliar clauses before approval.
Assess Food and Nutrition
Nutrition affects muscle strength, blood sugar control, bowel regularity, hydration, and recovery after illness. Visitors should review menus for protein sources, fresh produce, portion sizes, and meal variety.
Asking questions about diabetic diets, food allergies, renal restrictions, religious practices, modified textures, snacks, and assistance during meals is necessary. Residents often provide the clearest comments about taste and timing. Dining rooms should appear clean, accessible, and comfortable for people with walkers or limited hand strength.
Observe Daily Life
A scheduled tour presents the building at its best, so another unplanned visit can reveal ordinary routines. Families should note noise, odors, cleanliness, hallway traffic, and resident participation. Staff should describe activities involving exercise, music, crafts, outings, education, and quiet interests. The setting should match the older adult’s preferred pace.
Some people seek frequent conversation, while others value privacy. Meaningful routines and comfortable relationships often boost satisfaction more than attractive furnishings.
Speak With Residents
Residents can describe daily care with a candor that formal presentations may lack. Visitors might ask whether employees respond promptly, meals meet expectations, activities feel worthwhile, and concerns receive follow-up.
Conversations should remain brief, respectful, and voluntary. Several perspectives carry more weight than one comment. Families should also ask whether any changes in leadership, staffing, or ownership have affected services recently. Online reviews can suggest questions, but firsthand observation offers stronger evidence.
Check Policies and Communication
Families should read rules covering visitors, pets, personal furniture, transportation, smoking, overnight absences, roommates, and discharge procedures. Communication standards deserve equal attention.
Administrators should identify contacts for billing questions, health updates, complaints, and emergencies. Relatives can ask how often care plans are reviewed and whether updates arrive by phone, email, or written report. Clear procedures prevent families from missing key updates or information when health status changes or urgent decisions need to be made.
Conclusion
A sound choice rests on evidence gathered through observation, records, direct questions, and resident feedback. Families should compare care levels, staffing, safety measures, food service, activities, costs, and contract terms before selecting a residence.
The older adult’s comfort, dignity, abilities, and preferences should guide each discussion. A second visit, medical consultation, and a careful review of the agreement can expose overlooked concerns. Preparing well gives families greater confidence that the decision to move will remain appropriate even as care needs change.











Usually, buying a new set of tires is not part of anyone’s monthly budget plan. Yet, tires wear down, blow out, or simply age past the point of safety. When this happens, most drivers face the same unwelcome reality: the expense of buying a set of four new tires. This is also how drivers typically choose between two paths. They either pay the full amount upfront, or they spread the cost through financing.
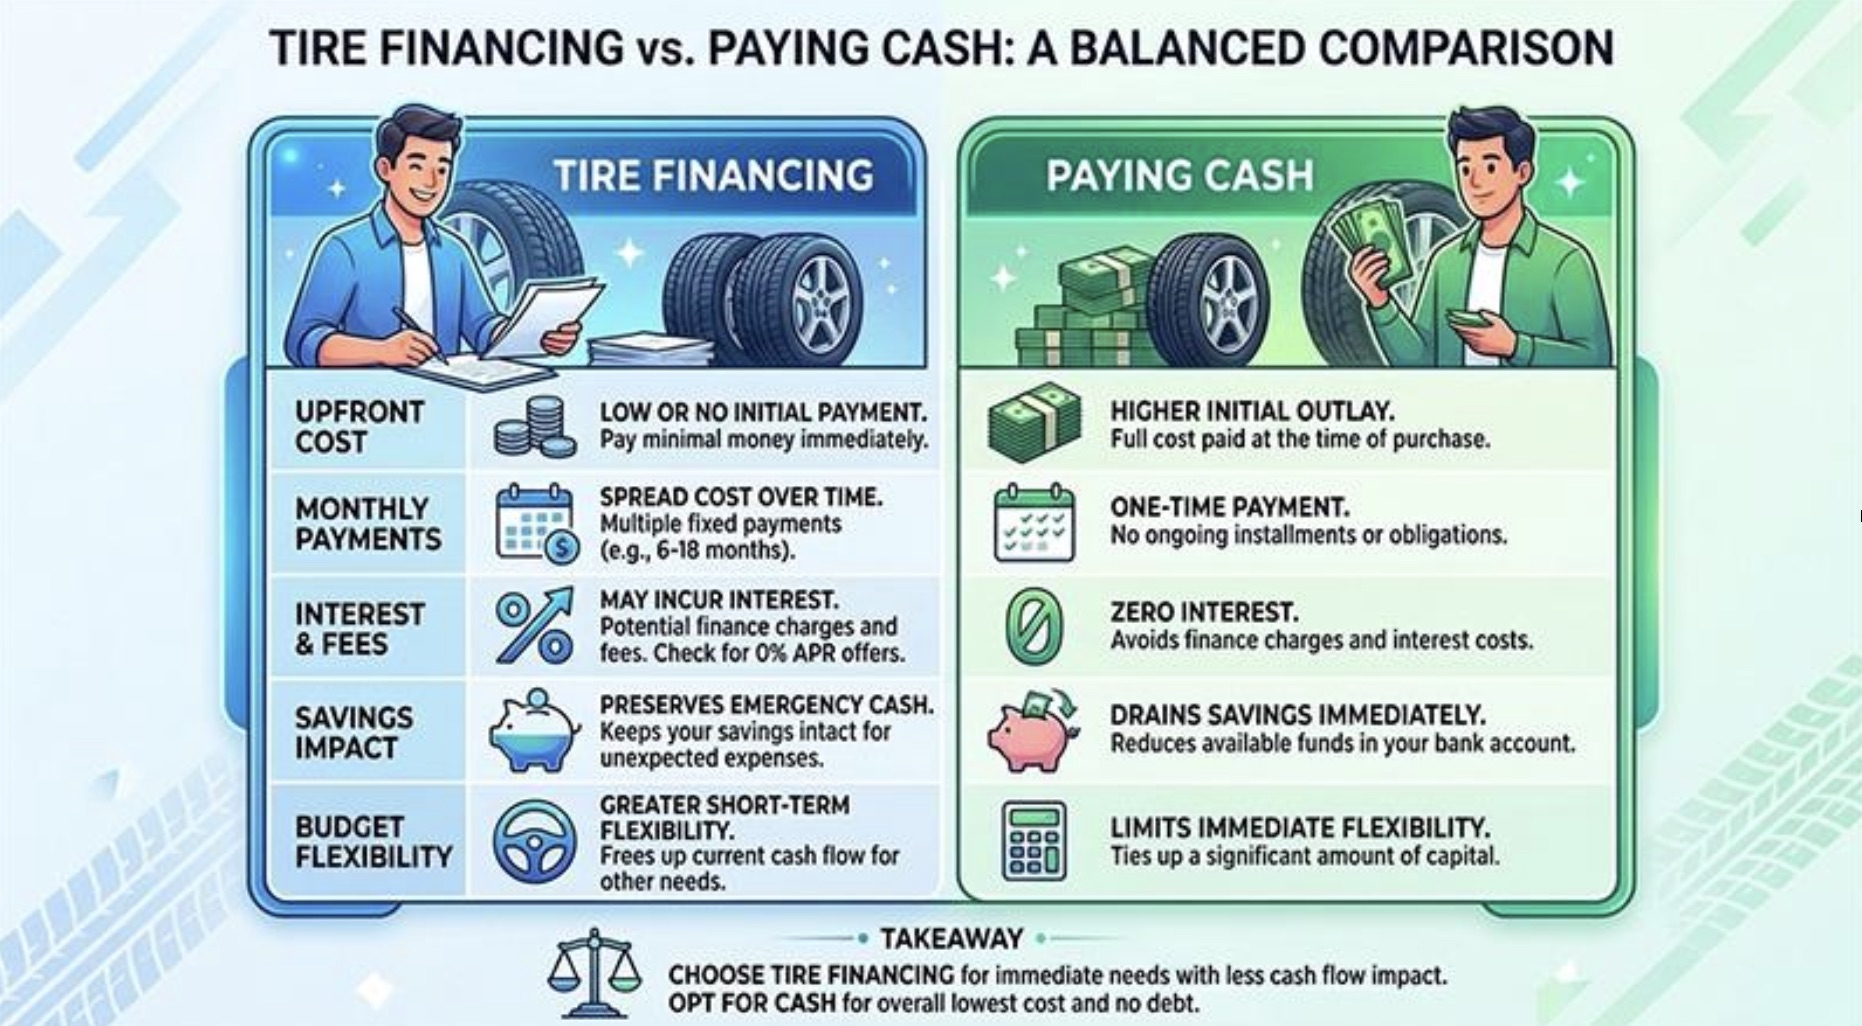
That choice raises a question worth thinking through before making a decision. Is it smarter to pay cash, or does financing actually make more sense? The simple answer is that there is no “one” right choice for every buyer. Paying cash means avoiding interest and walking away debt-free. However, tire financing can protect your savings and turn a high, sudden cost into something far more manageable.
What Is Tire Financing?
Tire financing works the same way as financing any other major purchase. Instead of paying the full price upfront, you split the cost into payments over an agreed period, often through the retailer directly or a third-party lender. The appeal here is clear: a smaller monthly payment feels easier to manage than one large sum. But the purchase price and the total amount you eventually repay aren’t always the same. Interest and fees can add up depending on the terms.
That’s exactly why you should read past the monthly figure and understanding the terms in front of you. The APR determines how much interest accrues over time, and some plans include origination fees, late penalties, or promotional terms, like zero-interest periods. Simply put, a low monthly payment can seem appealing at first, but it doesn’t tell the full story right away. What matters is the total repayment cost, not just what shows up each month.
The Benefits of Paying Cash for New Tires
For many buyers, paying cash feels more straightforward, and it comes with real advantages. Here is everything you need to know about your tire financing options:
You Can Avoid Interest
When you pay the full cash price, you completely eliminate financing charges. No APR works against you, and there’s no risk of the total creeping higher over time. The amount on the receipt is the amount you pay, and nothing more.
There Is No New Monthly Payment
Once the purchase is done, there’s no lingering balance. You are not adding another recurring line item to a household budget that may already be stretched across a mortgage, car payment, or other bills. For buyers who value simplicity and are able to pay the full amount, this can be worth considering.
You Know Exactly What You’re Spending
Paying cash keeps the cost immediate and transparent. There’s no repayment schedule to track, no fine print to revisit, and no chance of misjudging what you’ll owe later. That clarity can make it easier for some buyers to avoid taking on additional debt in the first place.
That said, paying cash isn’t automatically the more responsible choice for every buyer.
Draining savings to cover a tire purchase can leave less money available if a real emergency comes up, whether that’s a medical bill, a job loss, or another unexpected car repair. A cash purchase that empties your safety net can create more financial stress than it solves, even without a single dollar of interest attached.
The Benefits of Tire Financing
This is where financing tends to shine, especially for drivers who need new tires now but don’t want to disrupt their finances to get them.
You Can Preserve Your Savings
Tire financing lets you get the tires you need without dipping too much into your savings. That means that you’ll still have access to your savings in case of essential expenses that may come up without warning.
You Can Spread Out the Expense
Instead of paying the full cost in one transaction, financing lets you split the purchase into scheduled payments over time. This can make a necessary but sizable expense feel far more manageable, particularly for buyers who would otherwise need to rework their budget just to cover the cost in one shot.
You Can Replace Tires When You Need Them
Delaying the necessary replacement of damaged or old tires is a safety issue, not only a financial one. Waiting to replace them simply because you don’t have the full cash amount means driving longer than you should on tires that no longer perform the way they need to. Financing removes that pressure by letting you get new tires as soon as you need them.
Financing Can Provide More Budget Flexibility
For drivers with a steady income and some breathing room in their monthly budget, financing can turn a difficult, one-time expense into a manageable, predictable one. Instead of feeling the full impact of the purchase all at once, the cost is absorbed gradually, which can make it easier to simultaneously stay on top of other financial obligations.
The Downsides of Tire Financing
One big misconception is that financing does not have trade-offs, when in reality interest can raise the total cost beyond the original price. Not to mention that some plans add fees on top of that. Missing your payment will bring penalties and can hurt your credit, while promotional offers often come with conditions that work against you if the balance isn’t paid off on time.
For example: $600 in tires financed at a high APR over a year could mean repaying $650 or more once interest is factored in. That gap between sticker price and true cost is quite easy to miss when you only consider the monthly payments. Thus, before accepting a financing plan, you should know exactly how much you’ll have to pay in total, and not just how much shows up each month.
When Paying Cash Makes More Sense
If you have enough savings to cover the purchase without straining your emergency fund, then paying in cash makes a lot more sense. This is especially true if financing terms also come with a high interest or steep fees. Simply put, if you can absorb the cost comfortably, then paying upfront is often the simpler route. Just make sure not to empty your savings entirely to sidestep financing.
When Tire Financing May Be the Better Choice
Financing usually makes more sense when tires need to be replaced immediately and paying cash would dip significantly into your savings. If your income is reliable, the monthly payment fits comfortably into your budget, and the terms are reasonable, financing can turn a large expense into something manageable, as long as you understand the total amount you’ll repay is higher than the total amount you would’ve paid upfront.
How to Choose the Right Option for Your Budget
- Start with the full cost, including installation, not just the tire price itself.
- Figure out what your savings will look like if you choose to pay upfront.
- Look closely at the APR, any fees, and the full terms of the financing offer.
- Add up what you’d actually repay over the life of the plan, not just the monthly number.
- Check whether that monthly payment realistically fits your budget without strain.
- Go with whichever option covers what you need without putting your finances under unnecessary stress.
Conclusion
There’s no universal right answer between paying cash and financing. You should pay cash if you can comfortably afford the tires without touching your financial cushion, and if financing would only add unnecessary cost. Consider financing if paying the full amount upfront would strain your budget, and the terms available to you are manageable. Either way, the goal is the same: get the tires you need without creating financial stress you don’t need.
Health & Fitness
How Water Quality Affects Equipment Lifespan, Product Consistency, and Operating Costs in Business


Most business owners can recite their electricity bill, their payroll figure, and the price of their main supplies without thinking. Water rarely gets the same attention. It arrives, it works, and it disappears down a drain, which makes it easy to treat as a fixed background utility rather than an input that shapes results.
Yet water touches cleaning, cooking, cooling, rinsing, heating, and, in many businesses, the product itself. When its quality drifts, the effects show up somewhere else entirely, usually as a repair bill, a batch that came out wrong, or a machine that failed years earlier than it should have. Understanding what is in your water, and what your operation actually needs from it, is one of the quieter ways to protect both your equipment and your margins.
Where Water Quietly Enters Your Cost Structure
Businesses that run boilers, cooling towers, rinse lines, or ingredient water need a steady level of purity, and standard filters cannot deliver it because the substances causing the trouble are dissolved rather than suspended. Reverse osmosis closes that gap, using pressure to push water through a semi-permeable membrane that holds back dissolved salts, hardness minerals, and heavy metals while clean water passes through.
This is where companies choose reverse osmosis equipment to protect boilers and process machinery from scale, keep rinse results free of mineral spotting, and hold product quality steady from one batch to the next. Food and beverage plants, laboratories, pharmaceutical operations, and metal finishing lines rely on it for the same reason, because their output is only as consistent as the water feeding it.
Why Water Quality Reaches Further Than Most Owners Expect
Water rarely fails loudly. It changes slowly, and the symptoms appear in places that seem unconnected to it. A dishwasher that stops producing clear glassware. A boiler that burns more fuel than it did two winters ago. A rinse cycle that leaves marks nobody can explain. A cleaning routine that now takes longer and uses more product to reach the same standard.
Because these problems arrive gradually, teams adapt to them. Staff start running an extra cycle, adding more detergent, or wiping down surfaces that used to dry clean. The workaround becomes normal, the underlying cause stays unexamined, and the cost of it settles permanently into the operating budget.
The Everyday Problems That Drain Money Slowly
Hardness is the most familiar offender. Minerals carried in the supply settle on heating elements, inside pipes, and across any surface where water sits or evaporates. That layer acts as insulation, so equipment works harder to do the same job, uses more energy, and wears faster while doing it.
Other issues behave differently but cost just as much. Sediment clogs small openings and shortens the life of moving parts. Chlorine affects taste and odor in anything that people drink or eat. Iron leaves staining that cleaning cannot fully lift. Biological growth creates sanitation concerns in settings where sanitation is not negotiable.
What Poor Water Does to Equipment Over Time
Machines tend to be judged by the day they fail, but the damage usually began much earlier. Scale builds inside a heater for years before efficiency drops far enough to notice. Corrosion works on seals and fittings long before a leak appears. By the time something stops working, the equipment has often been operating under strain for a long stretch, consuming more energy and delivering less than it was designed to.
The financial effect is easy to overlook because it is spread out. Replacement cycles shorten. Service calls become more frequent. Warranty conversations get complicated when a supplier points at water quality as the cause. An operation that replaces key equipment every five years instead of every ten is paying a bill that never appears as a line item labeled water.
Product Consistency and What Customers Actually Notice
In many businesses, water is not a utility at all. It is an ingredient, a solvent, a coolant, or the final rinse that decides how a finished item looks. When its composition moves, the output moves with it.
Customers rarely describe the problem in those terms. They say the coffee tastes different this week. They mention that the glassware looks cloudy. They note that a surface finish is not as clean as the last order. They return a batch without being able to explain exactly what changed. Each of these is a quality complaint on the surface and a water question underneath.
Consistency is the real asset here. A business that can produce the same result on a Tuesday in February as it did on a Friday in August has removed a variable that competitors are still fighting. That reliability builds trust far more effectively than any single improvement to a product.
Why Maintenance Decides Whether the Investment Pays Off
A treatment system is not a purchase that keeps working on its own. Components wear, performance drifts, and the protection you paid for quietly weakens if nobody is checking. The warning signs are mild at first. Flow rates fall. Results become less consistent. Scale starts reappearing where it had disappeared. Energy use creeps upward again.
A workable plan covers scheduled service, regular water testing, clear performance records, and a team that knows what a developing problem looks like. Records matter more than most operators expect, because they turn guesswork into evidence. They show whether a problem is new or long-running, whether performance is declining steadily, and when a component is due for attention rather than overdue.
Treating Water as an Operating Decision
Water management rarely makes it onto a list of growth priorities, which is exactly why it stays a source of avoidable loss for so many businesses. Equipment that lasts longer, output that stays consistent, and maintenance costs that behave predictably all make an operation easier to run and easier to expand.
Customers will never compliment your water. They will notice cleaner results, steadier quality, and fewer disappointments, and they will draw their own conclusions about how the business is run. Getting the fundamentals right is not glamorous work, but it is usually what separates the operations that scale smoothly from the ones that spend their energy managing recurring problems they never diagnosed.

You need braces. What kind should you get? The options are generally metal vs ceramic braces. The New York Times says that metal braces are back ‘in style’ today, but many people also consider ceramic options.
What Is the Difference Between Metal and Ceramic Braces?
In short–aesthetics. While metal braces are shiny and silver with metal brackets, ceramic braces are clear and offer a more discreet look. Both brace types straighten teeth well, and both take the same treatment duration.
Which Braces Cost More: Metal or Ceramic?
The cost of ceramic braces and classic metal braces is generally comparable. However, sometimes one will cost more than the other. Some orthodontists will let the patient choose between the options and charge the same amount either way. Other providers price ceramic braces a bit higher as they are more aesthetic. If cost is important, check with your orthodontist about the price difference and decide from there. Metal braces are typically the budget-friendly option.
Which Type of Braces Is Easier to Maintain?
When looking into metal vs ceramic braces, maintenance is a big consideration. You will likely have the braces for at least a year and possibly several years. It is important that you are able to maintain whichever option you get. Metal braces will not discolor, but ceramic braces can stain. If you drink a lot of coffee or tea, metal braces could be the way to go.
What Are the Advantages and Disadvantages of Metal Braces?
There are going to be ups and downs to either of the brace options.
Advantages of Metal Braces
- Effectiveness
- Metal braces get the orthodontic job done.
- Affordable
- While any braces have a cost to them, metal braces are generally lower in cost than ceramic choices.
- Durable.. metal is virtually indestructible and will last for the duration of your treatment plan.
Disadvantages of Metal Braces
- Visible
- Metal braces are definitely going to show.
- Possible Irritating
- Metal can sometimes rub the gums and lips, causing irritation.
- Hard to clean.. the metal is hard to clean around.
What Are the Advantages and Disadvantages of Ceramic Braces?
Like metal braces, ceramic options have good parts and bad.
Advantages of Ceramic Braces
- Less Noticeable
- Ceramic braces show less overall.
- Effective
- Like metal braces, ceramic options do the orthodontic job well.
- Smooth Feeling
- These braces don’t rub the lips and gums in irritating ways.
Disadvantages of Ceramic Braces
- Possible Higher Cost
- Ceramic braces, since they are more aesthetic, are sometimes higher in cost.
- Staining
- The bands around the clear braces can stain over time.
- Fragile
- Ceramic braces could crack with hard use.
- The ceramic braces are a bit larger.
- Harder to Remove.. ceramic braces can crack, making it harder to remove once the treatment plan is complete.
Metal vs. Ceramic Braces: Which Should You Choose?
When you are ready to make the choice between metal braces vs ceramic braces, it all boils down to three things. First, your budget. If the ceramic braces are more costly, can you even afford that expenditure? If not, go with metal.
Second, consider the appearance you prefer. Metal braces are very much in style, so you may not mind that they show, but if you want something that blends in more, go with ceramic.
Third, consider your orthodontic needs with your expert. Ceramic and metal braces generally take care of the same issues, but if one is better than the other for your orthodontic needs, it is important to know that. The experts at Smiles + Grins will go through all of the details of your treatment plan and braces options until you are completely comfortable with every step of the process.
In conclusion
While metal braces are making a comeback, according to The Washington Post, ceramic braces are also a valid option to consider. Both choices are durable, but metal shows more than ceramic. While ceramic blends in nicely, it can stain over your year (or more) of use.
Keep in mind that metal braces vs ceramic braces isn’t usually a decision on effectiveness. The braces operate in the same fashion. You can get the results you want and need with either. Think instead about the cost, the aesthetics, and other pros and cons.
Whether you have made up your mind or are just starting the orthodontic process, contact the professionals at Smiles + Grins for help.
We can give you a full evaluation and consultation and talk over the options with you. We are happy to go over the advantages and disadvantages of both ceramic and metal braces until you are comfortable with the option you choose.

Modern mobile connectivity relies on embedded digital chips to connect devices to cellular networks without physical cards. Travelers prefer this digital approach to avoid the manual swap of hardware components during transit. These virtual profiles reside directly on the device motherboard and activate through simple software prompts.
Compatibility checks remain the first requirement for any successful setup of a digital plan. This article provides a comprehensive guide to setting up a digital data plan for global use.
Step 1: Buy Your eSIM and Keep It Ready for Use
A reliable travel eSIM provides a convenient way to access data across international borders. The purchase process begins on the official website, where users select a specific destination and data volume. Each plan features a set duration and a fixed amount of gigabytes to suit specific trip lengths. The platform delivers a unique digital profile to the user via email immediately after the payment is confirmed. This email contains the essential setup credentials and a secure QR code for the activation process.
Travelers must store this information in a safe location to ensure a smooth transition upon arrival.
Step 2: Scan QR to Install eSIM
The installation process requires a stable Wi-Fi connection to download the cellular profile to the device. Users open the camera app or the cellular settings menu to initiate the scan of the provided QR code. The device identifies the new network profile and prompts for permission to add the plan.
A clear screen message confirms that the digital card is ready for the next setup phase. Most devices allow multiple profiles to exist on one chip simultaneously for maximum convenience. This step ensures the device contains the necessary network credentials before the trip starts.
Step 3: Add the eSIM successfully to Your Device Settings
The device software needs specific labels to distinguish the new data plan from the primary home line. Users navigate to the cellular or mobile data section within the main settings menu to manage these labels.
The system allows custom names, such as travel or data, to help organize the active lines. This organization prevents confusion when the traveler needs to toggle between different network services. A clear label ensures that the device uses the correct resources for internet access while abroad.
Step 4: Activate or Start Your eSIM When You Are Ready to Travel
Most digital data plans remain inactive until the user triggers the start date or connects to a local tower. A eSIM usually activates its validity period the moment it attaches to a supported foreign network. Travelers should wait until they reach their destination to enable the line to preserve the full data duration.
The device settings menu provides a simple toggle switch to turn the specific line on or off. Users must ensure that the primary domestic line remains off for data to avoid extra costs. These steps guarantee that the data plan lasts for the entire duration of the trip.
- Enable the secondary cellular line once the aircraft lands at the destination.
- Check the provider instructions to see if a manual activation code is necessary.
- Monitor the data usage through the device settings to track the plan status.
- Confirm that the plan’s validity matches the intended length of the stay.
- Maintain the primary line in a standby state for text messages if needed.
Step 5: Turn On Cellular Line and Enable Data Roaming in Settings
The device needs permission to use foreign networks through the data roaming toggle in the settings menu. Users must select the travel plan as the default path for all cellular data traffic. This selection prevents the device from attempting to use the home carrier for expensive internet access.
The data roaming switch for the specific travel profile must be in the on position for the service to function. Modern smartphones provide separate roaming controls for each installed line to ensure precise control. This configuration allows the device to bridge the gap between the hardware and the local infrastructure.
Step 6: Connect Automatically to the Best Local Network at Your Destination
The mobile device searches for compatible local towers once the travel plan is active and roaming is on. Automatic network selection allows the phone to pick the strongest signal available in the current area.
This process usually takes a few minutes as the device authenticates with the local partner carrier. A signal strength indicator and a network name appear at the top of the screen to confirm success. Users can then access maps, browser apps, and communication tools without the need for local physical cards. Consistent data access ensures that the traveler stays connected to essential resources throughout the journey.
Digital connectivity requires a compatible device and a pre-purchased plan before departure for the best results. Successful installation of travel eSIM depends on a stable Wi-Fi connection and the correct roaming settings. Confirm your device is carrier-unlocked to ensure the new profile functions correctly on any international network provider during your trip.

I Had Revenue and Still Felt Broke. The Account Was the Problem.

Buying Probate Property? Watch Out for Will Fraud

Need an IT Consulting Services Request That Leads to Action? Clearlink Consulting Builds a Clear Technology Plan

Founder Liquidity Before an Exit: Alternatives to a Traditional Share Sale

I Built the Company With No Life Insurance. That Was Not Brave.

5 Ways For Startups To Succeed Making Acquisitions

77 Inspirational Quotes That Will Change Your Life
57 Memorable Kobe Bryant Quotes

(Images) 52 Motivational Picture Quotes For An Epic Year Of Success

40 Rare Motivational and Inspirational Picture Quotes

3 Prince EA Videos To Change Humanities Path To Greatness

(Video) What Is Success? An Entrepreneurial Story To Inspire You

(Inspirational Video) What If Today You Knew You Were Going To Take Your Last Breath?

How To Make Enough Money From A Blog To Quit Your Job – Kate McKibbin

How Finding Your Passion And Becoming An Entrepreneur Can Lead To Happiness – Chiquita Searle
-

 Life2 years ago
13 Meaningful Ways to Show Someone They Matter
-

 Life2 years ago
The 5 Stages of a Quarter-Life Crisis & What You Can Do
-

 Did You Know1 year ago
7 Surprising Life Lessons Video Games Taught Me That School Never Did
-

 Success Advice1 year ago
Stephen Covey’s 8 Leadership Habits That Will Change How You Lead Forever
-

 Life1 year ago
How to Stop the War in Your Head and Find Peace
-

 Featured2 years ago
The Psychology of Motivation: How to Keep Moving Forward Every Day
-

 Personal Development1 year ago
The Three-Second Pause That Changes How People Perceive You
-

 Explode Your Social Media1 year ago
Want More Views? Master These 6 YouTube Growth Tactics